
3 Best Cricut 4th of July Projects for a Patriotic Celebration
America's Independence Day is approaching, and we know the patriot in your wishes to get more creative. You want to show the world your love for the nation. So, you are searching the internet to get ideas for you to take up DIY projects to celebrate Independence Day. If it is the case, then you are in the right place. In this blog, we will talk about Cricut 4th of July projects. So, why the delay? Go through the blog and select the projects you want to make to celebrate this year's Independence Day.
1. Decorative Paper Rockets
You can decorate your home if you are looking to host a party on Independence Day. These decorative paper rockets are budget-friendly and can be cut using your Cricut machine. Also, assembling the cut pieces takes just a few minutes. Let us see the materials you need for this project.
- Red, white, and blue paper. Preferably thick paper or scrapbook paper.
- Further, you need a glue stick to stick the cut pieces together.
- Obviously, a Cricut machine unless you want to cut using scissors. But being honest, if you are clumsy like me, you will surely mess it up. So, just use your Cricut machine.
- And a Blue LightGrip mat.
- After that, a Design file.
- Next, let us begin to do the project.
- Upload the design or SVG file of the rocket design to the Design Space. The file should be ready to cut, but you can re-work the colors if you want.

- Then, you need to go to the "Make It" on the upper right. Next, you need to select the type of mat load type. As you are using paper, you need to choose on the mat.
- Later change your paper size. If you use Cricut Explore and Cricut Maker, the Design Space will automatically select 12" x 12" material. So, you need to use the options and select the smallest paper size if it is needed.
- Next, enter to continue. And when you are on the Make Screen, you must select your material type.
- Once you set the paper setting to match your type of paper, you must place the paper on the cutting mat. And load the mat to the Cricut machine for it to cut.
- After loading the mt, you must command the Cricut app to the Cricut machine to start cutting the material.
- Now, you need to assemble the cut pieces. First, glue the stars on the main body of the rocket. Then, you need to roll the rocket body into a cylinder shape and glue the ends. It is advised to use a thin layer of tacky glue.

- Further, to make the rocket heads, you need to curl the "Pacman" shaped cut pieces. After curling, you need to glue one edge to the other edge. Then, place the head on top of the rocket's main body. To make it stable, use a bit of glue and stick them together.

- Next comes the fins; you need to attach these fins at the other end of the rocket's main body. To do this, you only have to slide them on the bottom of the cylinder.

- Then you are done with the first rocket. Repeat the above steps to complete the rest of the rocket designs.

2. Fireworks Treat Bags
Moving on to the next Cricut 4th of July projects. Let us see how to make Firework Bags for you to put candies in and send as gifts to others.
- In the first step, you will be able to find a lot of fireworks designs in Design Space. So, choose any of the already available designs or design one for yourself.
- For this DIY project, you need a small fabric bag, a Cricut machine, a Holographic Sparkle iron-on, and an EasyPress or common household Iron.
- Let us begin. First, you must select the design and load it into the working space. Then if needed, you have to resize the design according to the size of your bag.
- Next, load the iron-on the mat to the Cricut machine.
- Later, give the command for the Cricut to cut the iron-on material.
- Once the machine cuts the iron-on, you must remove all excess materials using tweezers.
- Now, you will be left with just the designs of Fireworks. Next, take the EasyPress and set the temperature recommended for the material used.
- Once the press is hot enough, keep the Iron-on top of the bag and place a carrier sheet on top of the iron-on.
- Then press the material against the bag for a few seconds. Later, remove the EasyPress and take off the carrier sheet.
- Finally, let the bag be untouched for a few hours.

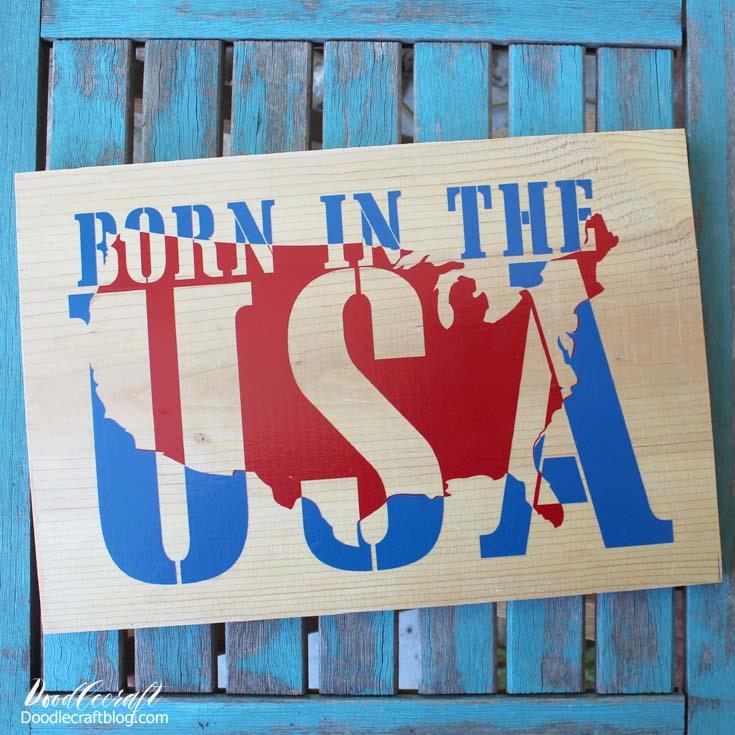
3. Wooden Sign "Born In the USA"
If you are patriotic and a huge fan of Bruce Springsteen, then "Born In the USA" is no stranger to you. So, this project may become your favorite among all the Cricut 4th July projects. Let's begin
- You will need a Board. It can be either cardboard or wood. Next, you need red and blue vinyl, a transfer tape. Most Importantly, a Cricut machine.
- Upload the "Born In The USA" image file to your Design Space. You can get the image from the internet or just search on Design Space.
- After uploading the image file, you need to resize it depending on the dimensions of your board. Then load the vinyl on the mat; you must load the red and blue vinyl separately.
- Once you have the cuts of red and blue vinyl, weed out the extra materials. After weeding out, cover the vinyl with transfer tape.
- Next, you need to remove the white paper and keep the vinyl on top of the wooden board.
- Then, slowly slide the transfer tape, ensure the vinyl stays attached to the board, and keep it aside for the next color.
- The next step is to remove the second vinyl design. Then, you must line it up against the previous design and slowly slide it off the transfer sheet again.
- Now you have your own Born In The USA board to hand on to your gate or door.
Conclusion
To sum up, these Cricut 4th of July projects are here to help you with your Independence Day celebration. The project ideas covered in this blog are Decorative Paper Rockets, Fireworks Treat Bags, and a Wooden sign of Born In The USA! These designs are to help you with being creative. And to make sure that your celebration of Independence Day '23 is more memorable than last year's.
Visit: cricut.com/setup
cricut design space website
Cricut Design Space app
www.cricut.com/setup